Looking for tips on how to paint on candles? With the rising trend of painted candles, it’s no surprise that many people are interested in learning this creative skill. However, to achieve the best outcome, it’s important to use the right materials and technique.
By following the steps outlined in this guide, you can create stunning painted candles at home. Without further ado, here’s how to paint candles!
How To Paint On Candles
I may earn a small commission for purchases made through links in this post at no cost to you. Thank you for supporting Frugal Home Addict! Learn more about my disclaimer policy here.
Materials Needed
Here is a list of essential materials required for painting candles:
- Candle wax – This is the base material you’ll be painting on. Make sure to choose a candle that is smooth and has a matte finish to ensure better adherence of the paint.
- Sandpaper – Use this to remove any shine and create a surface that the paint can adhere to.
- Paint brushes – Use different-sized paintbrushes to achieve different effects and details.
- Acrylic paint (recommended: Apple Barrel Acrylic Paint Set) – This type of paint is the most commonly used for painting on candles. It’s water-soluble, dries quickly, and has a wide variety of colors to choose from. Just make sure to pick a product that is non-toxic.
- Pencil – Use a pencil to sketch out your design before painting to avoid mistakes and ensure accuracy.
- Mod Podge – Use this to create a clear, protective barrier to prevent smudging and fading of the painted design.
- Heat gun (optional) – This tool is used to melt the wax slightly and smooth out the paint, creating a glossy finish.
- Painter’s tape (optional) – Use this to create a clean edge and prevent the paint from smudging or bleeding.
- Stencils (optional) – Stencils are great for creating intricate designs and patterns, especially if you’re not confident in your freehand painting skills.
Selecting The Right Paint
When it comes to painting candles, selecting the right type of paint is crucial for achieving beautiful and long-lasting results. Here are some tips to help you choose the right paint for your candle project:
1. Choose a non-toxic paint
Not all paints are suitable for use on candles. Look for paints that are non-toxic, such as most acrylic paints. These types of paint also adhere well to the surface of the candle and are safe to use.
2. Consider the color
When selecting a paint color, keep in mind that some colors may require more coats than others to achieve full coverage. Lighter colors may require more coats, while darker colors may require fewer coats. Additionally, some colors may appear differently on the surface of the candle than inside the container.
3. Test the paint on a small area first
Before painting the entire candle, it’s a good idea to test the paint on a small area first to ensure that it adheres well and dries properly. This will also give you a chance to see how the color will appear on the candle surface and make any necessary adjustments before painting the entire candle.
4. Consider the finish
The finish of your paint can greatly affect the final look of your candle. You can choose from a variety of finishes when painting candles, including matte, glossy, or metallic.
- RELATED: How To Make Paint Reflective
By keeping these tips in mind, you can select the right paint for your candle project and create beautiful, personalized candles that are sure to impress. With the right paint and some creativity, you can transform plain candles into works of art that will add a touch of warmth and elegance to any room.
Best Paint For Candles: Apple Barrel Acrylic Paint Set
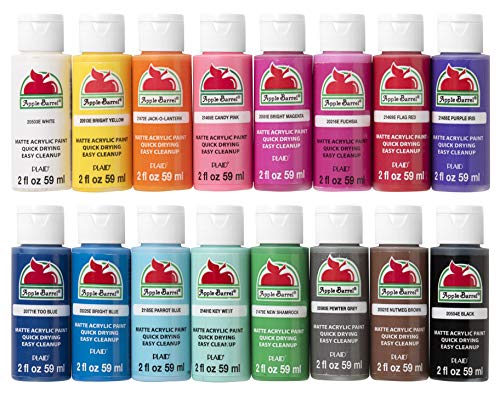
This Apple Barrel Acrylic Paint Set is ideal for painting on candles. It adheres well to the wax surface, dries quickly, and is available in a variety of colors. The paint is water-based, non-toxic, and durable, ensuring long-lasting, vibrant colors and a beautiful finish.
Preparing Your Candles
Now that you have your materials ready, it’s time to prepare your candles for painting. Follow these steps to ensure that your candles are ready for your creative touch.
1. Cleaning your candles
Before you start painting, it’s important to clean your candles thoroughly. Use a soft cloth or a paper towel to wipe away any dust or debris from the surface of the candle.
If there are any stubborn stains or marks, you can use a mild soap and water to gently clean the surface. Make sure to dry the candle completely before moving on to the next step.
2. Sanding
If you’re working with candles that have a glossy finish, you may need to sand them lightly with sandpaper to remove any shine and create a surface that the paint can adhere to. Once you’ve sanded the candle, wipe it down with a clean cloth to remove any debris.
3. Applying a base coat
Applying a base coat of paint to your candles is essential for achieving a smooth and even finish. Choose a color that complements your design and apply a thin layer of paint to the entire surface of the candle. Allow the paint to dry completely before moving on to the next step.
How To Paint On Candles
By following the steps above and preparing your candles properly, you’ll have a sturdy and smooth surface to paint on. This will make it easier for you to create your desired design and ensure that your finished product looks polished and professional.
Once your candles are prepped and ready, it’s time to unleash your creativity and start painting! Here’s how to paint on candles:
- Sketch your design on the candle using a pencil. This will serve as a guide for painting.
- Choose your acrylic paint colors and pour them onto a disposable plate.
- Dip your paintbrush into one of the paint colors and start painting your design onto the candle. Be sure to use a light hand and not press too hard, as this may cause the candle to dent or scratch.
- Allow the paint to dry completely before continuing to paint other areas of the candle. If necessary, use masking tape to cover any painted areas in order to prevent smudging or overlapping.
- Continue painting until your design is complete. Let the candle dry completely before moving on to the next step.
Letting The Candle Dry
Once you’ve finished painting and adding details to your candle, it’s important to let it dry completely before using or handling it.
This step ensures that the paint and any added details have fully adhered to the candle’s surface. Additionally, allowing the paint to dry completely can help extend the life of your candle and prevent any damage to the design.
Tips for preventing smudging or smearing
To prevent smudging or smearing, it’s important to handle your candle as little as possible while it’s drying. Additionally, make sure to place your candle in a cool, dry place where it won’t be exposed to moisture or direct sunlight while it dries.
Using a heat gun to speed up the drying process
If you’re short on time and need to speed up the drying process, you can use a heat gun to gently and evenly dry the paint. However, it’s important to use caution when using a heat gun, as excessive heat can cause the wax in the candle to melt or warp.

To use a heat gun safely, hold it at least six inches away from the candle and keep it moving continuously to prevent the heat from concentrating in one area. Test the temperature of the candle with your hand periodically to make sure it’s not getting too hot.
Using a heat gun can be a helpful tool for speeding up the drying process, but it’s important to use it carefully and only when necessary.
Applying A Sealant
Using a sealant to protect the design is essential when painting on candles.
When applying sealant, it’s important to use a well-ventilated area and protect your work surface. Apply sealant in thin coats, allowing each coat to dry before applying the next. To achieve the best results, use a light hand and avoid excessive brushstrokes.
With these tips in mind, you can ensure that your painted candles will maintain their beautiful design for years to come.
Best Sealant For Painted Candles: Mod Podge Waterbase Sealer, Glue and Finish
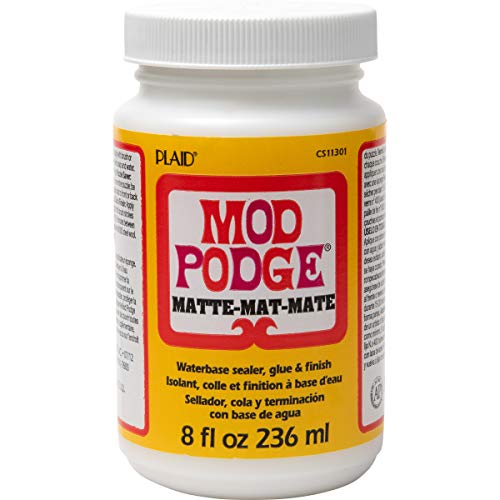
Mod Podge is a versatile sealant that can be used on a variety of surfaces, including candles. It provides a clear, protective barrier that helps to prevent smudging and fading of the painted design.
Mod Podge Waterbase Sealer, Glue and Finish is the ultimate sealer for candles due to its exceptional features. This water-based and non-toxic sealer is safe to use on candles and dries clear without affecting the color or design of the candle. It creates a durable and protective seal that prevents the paint from chipping or peeling, ensuring that the candle remains beautiful for a long time.
Tips And Tricks For Painting Candles
Painting candles can be a fun and creative activity that allows you to customize and personalize your candles. However, it can be challenging to achieve the desired results for beginners. Here are some tips on how to paint candles.
- Choose the right paint: Not all paints are suitable for candles. You need to choose a paint that is specifically designed for candles, such as acrylic paint. These paints adhere well to the candle surface and are durable.
- Clean the candle surface: Before painting, make sure that the candle surface is clean and free from dust or debris. You can wipe the surface with a damp cloth and let it dry completely before painting.
- Apply the paint in thin layers: Instead of applying a thick layer of paint in one go, it’s better to apply several thin layers of paint. This allows the paint to dry properly and prevents it from cracking or peeling.
- Let the paint dry completely: After each layer of paint, allow the candle to dry completely before applying the next layer. This will ensure that the paint adheres well and doesn’t smudge or smear.
- Use a small brush: When painting intricate designs or details on the candle, use a small brush with fine bristles. This will help you achieve precise lines and details.
- Protect the painted surface: Once you have painted the candle, it’s essential to protect the painted surface from damage. You can do this by applying a layer of Mod Podge Waterbase Sealer, Glue, and Finish. This will create a protective layer over the painted surface and prevent the paint from chipping or peeling.
- Experiment with different techniques: Don’t be afraid to experiment with different techniques, such as stenciling, masking, or using a sponge to create different effects on the candle surface. This will allow you to create unique and interesting designs.
- Consider the color of the candle: The color of the candle can affect the final result of your painting. If you’re using lighter colors, they may not show up well on darker candles. Consider painting on white or light-colored candles for better visibility of your design.
- Practice on a small surface: If you’re new to painting candles, it’s a good idea to practice on a small surface before painting a larger candle. This will allow you to get a feel for the paint and brush and experiment with different techniques without ruining your larger candle.
Conclusion
In conclusion, painting on candles can be a fun and creative way to add a personal touch to your home decor or gift-giving. In this post, I’ve gathered the best method on how to paint on candles. By following the steps outlined in this post, you can create beautifully painted candles that showcase your unique style and personality.
Remember to choose the right materials, prepare your candle properly, and take your time when painting to ensure the best results. With a little practice and patience, you’ll be able to create stunning hand-painted candles that will impress everyone who sees them. So grab your brushes and paints and get ready to unleash your creativity on your next candle painting project!
I hope this post gave you some helpful tips on how to paint candles. If you enjoyed this post, you might also like the ones below:
- RELATED: How To Paint Gourds (Best Paint For Gourds)
- RELATED: How To Paint A Rock (3 Easy Ways)
- RELATED: How To Paint Mugs (4 Easy Ways)